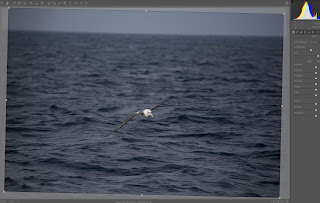
When you place an image in a public space like an online gallery then, it must have the fundamentals right. I’m not talking about intensive Photoshop treatment but, just basic corrections.
Note* an image can also be sloping even if the horizon is not visible.
So, I thought I’d put together a quick guide on straightening images in Adobe Camera RAW or Photoshop. Sorry, I don’t do LightRoom but, if you do then the Camera RAW section will be fairly similar.
Straightening an Image - Adobe Camera RAW (ACR)
In Adobe Bridge, double click on the RAW image you wish to straighten, double click or right click and select ‘Open in Adobe Camera RAW…’from the menu to open the image. Please note that if you double click the image then Photoshop will start to open but the ACR interface will pop up before it fully opens in Photoshop.
In the ACR window, in the right hand column, ensure that the ‘Iris’ icon is selected.

On the Toolbar at the top of the screen, look for the ‘Straighten Tool’ in the shape of a spirit level.

Move this new icon to the edge of the object that may help you straighten the image such as a horizon line or the edge of a building etc. Hold down the left mouse button and whilst still holding the mouse button down drag the icon across the image to the other end of the straight edge and once it’s aligned correctly, release the mouse button.

The image will still be at an angle but it will now have a crop box around it. You will notice that the crop box will be drawn within the bounds of the image and this is the result of the image after it has been rotated. Please note you will lose some detail off the edges and if this is an issue then you should shoot using the camera level and avoid having to straighten the image at all.

If you also wish to crop the image you can adjust the crop handles as necessary and then double click within the crop box to accept it. Please Note* that if you click on the crop tool again, the image will re-acquire its original angle with the crop box around it. This is because the image hasn’t actually been adjusted until you go ahead and click ‘Open Image’ or ‘Done’. Even after clicking ‘Done’ the image can be returned to its original state because the changes are actually contained in a sidecar file.
To do this, press ‘CTRL J’ to create a new duplicate layer then select ‘Camera RAW Filter’ from the ‘Filter’ menu. Then follow the steps in the previous article.
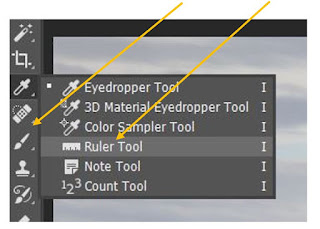
To use the ‘Ruler’ tool, with the image open in Photoshop, look in the toolbar down the left side of the screen for the ‘Eyedropper’ icon. Click and hold the left mouse button on the eyedropper and a list of tools underneath should be shown and whilst still holding the mouse button, move the pointer onto the ‘Ruler Tool’ and release the button.

Note* an image can also be sloping even if the horizon is not visible.
So, I thought I’d put together a quick guide on straightening images in Adobe Camera RAW or Photoshop. Sorry, I don’t do LightRoom but, if you do then the Camera RAW section will be fairly similar.
Straightening an Image - Adobe Camera RAW (ACR)
In Adobe Bridge, double click on the RAW image you wish to straighten, double click or right click and select ‘Open in Adobe Camera RAW…’from the menu to open the image. Please note that if you double click the image then Photoshop will start to open but the ACR interface will pop up before it fully opens in Photoshop.
In the ACR window, in the right hand column, ensure that the ‘Iris’ icon is selected.

On the Toolbar at the top of the screen, look for the ‘Straighten Tool’ in the shape of a spirit level.

Move this new icon to the edge of the object that may help you straighten the image such as a horizon line or the edge of a building etc. Hold down the left mouse button and whilst still holding the mouse button down drag the icon across the image to the other end of the straight edge and once it’s aligned correctly, release the mouse button.

The image will still be at an angle but it will now have a crop box around it. You will notice that the crop box will be drawn within the bounds of the image and this is the result of the image after it has been rotated. Please note you will lose some detail off the edges and if this is an issue then you should shoot using the camera level and avoid having to straighten the image at all.

If you also wish to crop the image you can adjust the crop handles as necessary and then double click within the crop box to accept it. Please Note* that if you click on the crop tool again, the image will re-acquire its original angle with the crop box around it. This is because the image hasn’t actually been adjusted until you go ahead and click ‘Open Image’ or ‘Done’. Even after clicking ‘Done’ the image can be returned to its original state because the changes are actually contained in a sidecar file.
Straightening an Image - Photoshop
In Photoshop you have two choices, you can either straighten the image using the ‘Ruler’ tool or you can open the image back in ACR using the ‘Camera RAW Filter’ and use the previous technique. Please note that this is only available in the very latest Photoshop versions.To do this, press ‘CTRL J’ to create a new duplicate layer then select ‘Camera RAW Filter’ from the ‘Filter’ menu. Then follow the steps in the previous article.
To use the ‘Ruler’ tool, with the image open in Photoshop, look in the toolbar down the left side of the screen for the ‘Eyedropper’ icon. Click and hold the left mouse button on the eyedropper and a list of tools underneath should be shown and whilst still holding the mouse button, move the pointer onto the ‘Ruler Tool’ and release the button.

The icon on the toolbar should now change to the Ruler tool and there should be some new options on the information bar at the top of the screen above the image.

When you move the mouse pointer onto the image the arrow should now have a small ruler next to it. To straighten the image you can now use the same method as in ACR, click and hold the left mouse button and drag it across the reference points. When you have it aligned correctly, release the mouse button and the line should remain on the screen.

Also, the options in the information bar at the top should have now become active.

These options are self-explanatory, select ‘Use Measurement Scale’ to give you a grid to help align the image manually, use ‘Clear’ to remove the line and start again or select ‘Straighten Layer’ to straighten the layer along the line you've drawn. The term layer is used because when we clicked the ruler tool, Photoshop automatically created a duplicate layer. Please Note* that if you use this option, then Photoshop will attempt to fill in the gaps at the corners created by rotating the image so you will need to check each corner to ensure it has done a reasonable job of filling in the space. In this case it has not rendered the sky very well so you can either crop this out or try to fix it using the tools available.

When you move the mouse pointer onto the image the arrow should now have a small ruler next to it. To straighten the image you can now use the same method as in ACR, click and hold the left mouse button and drag it across the reference points. When you have it aligned correctly, release the mouse button and the line should remain on the screen.

Also, the options in the information bar at the top should have now become active.

These options are self-explanatory, select ‘Use Measurement Scale’ to give you a grid to help align the image manually, use ‘Clear’ to remove the line and start again or select ‘Straighten Layer’ to straighten the layer along the line you've drawn. The term layer is used because when we clicked the ruler tool, Photoshop automatically created a duplicate layer. Please Note* that if you use this option, then Photoshop will attempt to fill in the gaps at the corners created by rotating the image so you will need to check each corner to ensure it has done a reasonable job of filling in the space. In this case it has not rendered the sky very well so you can either crop this out or try to fix it using the tools available.
Please note that as with all Photoshop processes, there are a few ways of achieving the desired effect for e.g. you can also straighten images using the crop function in both Photoshop and ACR.

No comments:
Post a Comment
Thank you for commenting, please keep it clean and friendly, cheers.