Before sharpening any image using any method, all other processing should be completed. Usually, sharpening is the last step of any post production editing.
So what is the process involved? With your image editing completed in Photoshop, you are ready to apply sharpening or with LightRoom open your image into Photoshop.
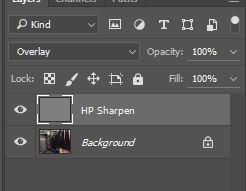
1. Create a new duplicate layer (CTRL & J)or if you are working in PS and have a lot of layers and the last layer is an adjustment layer then use CTRL, ALT, SHIFT and E to create a new layer with all the layers below applied but not flattened. Name this layer 'HP Sharpen'.
2. With the new layer active (highlighted), on the menu bar select 'Filter/Other/High Pass...'.
3. Your image should have gone grey and new 'High Pass' window will have appeared. Please ensure that the 'Preview' box is ticked in this new window.
4. Adjustment of the 'Radius' slider at the bottom of the new window will now start to show the areas of the image through the grey that are going to be sharpened by this process. Each image requires a different setting depending on image size etc. however, if you go too far with the radius, the image will be grossly over-sharpened.
Note* Once the High Pass process is complete, it is possible to reduce sharpening to an extent using the opacity of the layer. However, if you under sharpen the image you cannot increase sharpening beyond the maximum that was set using the radius slider. Therefore it is wise to slightly over set the radius (over sharpen) a little during the High Pass process so it can be reduced and then re-increased if the opacity has been reduced too far.
5. Once you are happy with the settings, in the new window select 'OK' to set the high pass into the image. However, the image will still appear to be grey.
6. Now look across at the layer on the right side of PS and just above it should be a pull down menu with 'Normal' selected. Pull down that menu and select 'Overlay'. Your image will now have appeared normal with the High Pass sharpening applied.
7. By clicking on the eye symbol to the left of the layer 'HP Sharpen' layer, switch the layer on and off to see the effect of the sharpening.
8. If the sharpening is too much, you can reduce it by reducing the opacity of the layer. To do this, ensure the HP Sharpen layer is active and look for the word 'Opacity' to the right of where 'Normal' was. You can either use the pull down menu or hover the mouse over the word Opacity and holding down the left button, slide the mouse to the left to reduce the amount. The adjustment starts at 100% and can only be reduced and once below 100% it can be increased back to a maximum of 100% again.


No comments:
Post a Comment
Thank you for commenting, please keep it clean and friendly, cheers.